Home / Installation Guidelines
Installation Guidelines
Handling
1) To prevent breakage, we recommended keeping all large format tiles in their original packaging during handling.
2) To handle large format tiles, we recommend using lifting tools with a sufficient load capacity.
3) The use of a forklift is recommended; however, it has to be equipped with the following fork details :
• Minimum length of 1.2 m if the crates are handled resting on the long side.
• Minimum length of 2.1 m if the crates are handled resting on the short side. It is recommended that you handle the A-Frame individually.
Cutting
1) When cutting large format tiles, we recommend using professional dry cutters. Using other tools may lead to uneven cuts or breakage of the material.
2) It is recommended to check the cutter blade before any cut.
3) A damaged blade increases the risk of damage.
Background
1) Prepare a screed with a flat, dry, compact, dust-free surface without cracks or visible damage. The ideal height difference should be no more than 3 mm, measured using a 2 m spirit level.
2) In case of slightly cracked or non-solid screed, it is recommended to use a preventing mat between substrate & slab. The screed should have suitable hardness and mechanical resistance to stresses due to the final uses. It should be prepared using perimeter bands & all structural expansion joints as necessary. The moisture of the screed must be ≤ 4%
3) It should be according to BS 8204-1-2003 or DIN 18560 standards.
Laying with adhesives
1) We recommend laying with this technique, which should be carried out by suitably qualified workers with appropriate equipment.
2) While choosing the adhesive, we recommend that you consider the following : the type of large-format tiles (the group to which they belong and their size), the type of surface to be tiled, and the intended use of the room.
3) It is recommended that dry laying be done before the final laying. The direction of tiles can be checked through punches (on the back of tiles).
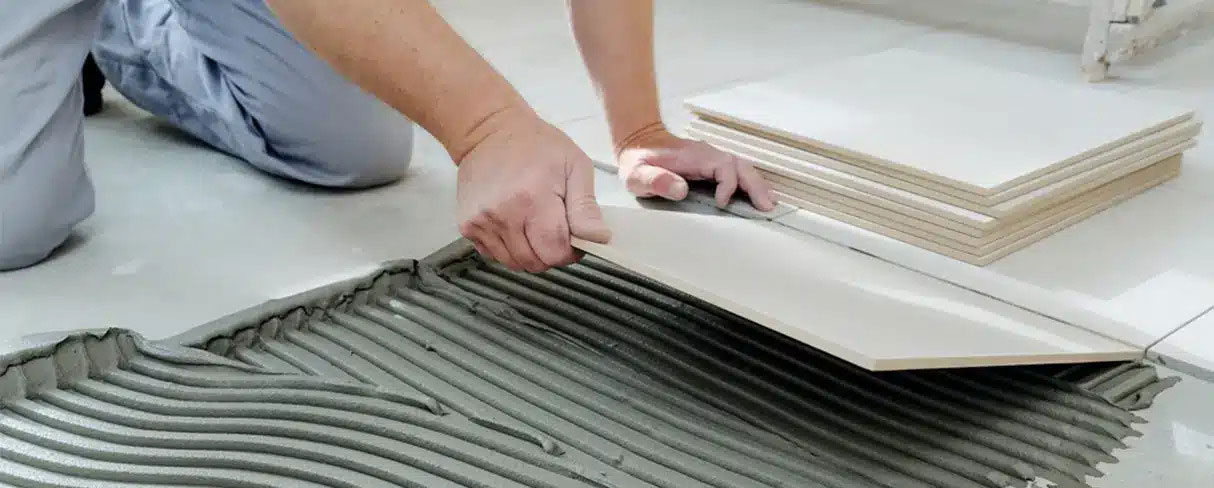
4) The adhesive should be applied to the floor and on the backside of tiles with a 3-4 mm thickness.
5) We recommend you check the material before the adhesive dries to make corrections.
6) Adhesive will vary depending on the surface, so follow the manufacturer's recommendation.
7) Apply the adhesive to the back of the slab with a 3mm trowel. It should be well distributed on the corners and edges.
8) It must be spread over in one direction only. Ideally, it should be spread towards the shortest direction of the tile.
9) Spread the adhesive for one tile (pc) onto the floor and substrate using a 15mm U-notch or a 10mm V-notch trowel. Follow the same direction as previously applied to the back of the slab. The adhesive should have 100% contact with the tiles/substrate to avoid a hollow sound.
10) It is recommended to start from the center of the slabs and then move towards the edges.
11) Tap the slab with a rubber mallet for a complete fixing, ensuring the air is expelled.
12) It is recommended that slabs be handled with appropriate equipment.